Brown Butter Chocolate Chip Challah Rolls
Recently, instead of lying on the floor feeling impending doom, I’ve been trying to do positive things, one of which is baking challah. Here’s a recipe that has cheered me up, and I hope will cheer you, too––or at least give you something to do while you watch the horrible/amazing new CW drama Riverdale and wonder when Betty and Veronica will get together.
This recipe combines my own ideas with elements of Baking with Julia and other recipes. It is indulgent but not disgustingly rich––sweet and a little savory, comforting and homemade. It also only has two rises, so it’s going to be a lot less time-consuming than other challah recipes.
I know this seems like a lot of egg yolks, but don’t be nervous! Egg yolks help create a softer bread and a higher rise; these eggs are the reason there are only two rises, and not three.
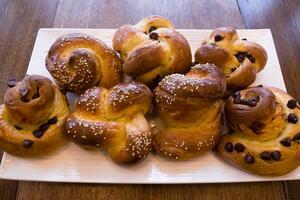
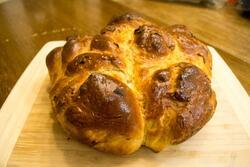
You can shape the rolls easily or aim for something more complicated––they will look (and taste) great either way. Also, feel free to put in more chocolate chips than I did!
Ingredients:
½ cup [1 stick] unsalted butter
2 ¼ teaspoons (or, ¼ oz) packet of active dry yeast
1 cup warm water
4 cups flour
7 egg yolks (some egg whites okay if you get tired of separating them)
¼ cup granulated sugar
1 teaspoon kosher salt
½ cup chocolate chips
2 teaspoons cinnamon
Additional:
1 tablespoon melted butter
1 egg
Mini chocolate chips
Materials:
Dough Hook and mixing bowl (optional)
Baking sheets
Parchment paper or Silpat mats
Pastry or basting brush (optional)
Directions:
Brown the butter! Browning butter might seem complicated, but is actually the easiest thing in the world. Cut butter into chunks, about an inch each. Melt the butter in a small saucepan on medium heat. Once the butter is mostly melted, it’s going to start to aggressively bubble for a minute then start to brown. Once it’s a golden brown edging into dark brown, give it another 30 seconds then turn off the burner and remove the pan from heat. I pour the brown butter immediately into a cool bowl so it will chill faster. If you’re in a time crunch, put the bowl in the fridge.
Pour a packet of yeast (roughly 1 tablespoon) into ½ cup warm water. Mix together, set aside. Make sure the yeast is bubbling. (This not a super difficult recipe but it is emotionally devastating to put the time into a yeast dough when it doesn’t rise!)
Separate out 7 egg yolks, but don’t worry if some of the whites end up in the yolks. (Yes, I know, it feels wasteful. I recommend setting aside the egg whites and doing something like an egg white omelette or meringue).
In your mixing bowl, mix together flour, salt, egg yolks, brown butter, cinnamon, sugar, and chocolate chips.
Pour the water and yeast into the mixture.
Use a dough hook set to medium for 3 minutes. Or, if you’re kneading by hand, knead on a lightly floured surface until the dough is slightly elastic and smooth, about 7 to 10 minutes.
Brush melted butter along the sides and bottom of your mixing bowl or a new bowl then put in dough. Cover plastic wrap with more melted butter and use it to cover the bowl (buttered side down), then drape a kitchen towel over the bowl Set aside in your kitchen or––if your kitchen is like mine and freezing all the time––in an oven set at about 80°.
Take the dough out after about 75 minutes. It should hopefully have doubled in size.
Experience one of the most beautiful feelings in the world when you punch down the warm, buttery dough.
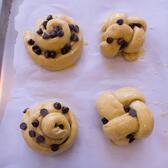
Separate dough into as many pieces as you want. I did eight, but if you’re going with the simple spiral roll, you could go for ten or more.
Prepare two baking sheets with parchment paper or Silpat mats.
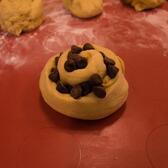
Roll out each dough section into a rope at least 12 to 15 inches long. Feel free to sprinkle mini chocolate chips onto dough before braiding.
If you’re doing a spiral, take one end and start coiling inwards and upwards.
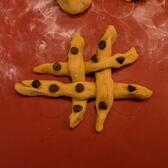
f you you want to get a little fancier, separate each ball into four equal sections. Roll them out into ropes, then create a woven hashtag shape. I can’t even begin to figure out how to explain this formation in words, but here’s a good video summary starting at 1:11.
This looks very fancy and kind of adorable, but is at least 30% more frustrating than the regular spirals.
Set formed rolls aside on the baking sheets for at least 30 minutes, covered loosely by kitchen towels. In the meantime, preheat oven to 350°.
Crack another egg (I KNOW! I promise this is the last egg). After the 30 minutes are up, brush egg onto all loaves, making sure to get an even coating all around them and into the crevices.
Put the rolls in the oven, uncovered, and set a timer for 20 minutes.
Since the challah is going to expand a lot in the beginning, coat more egg wash over the uncovered bits after the first 10 minutes of baking. Rotate pan in the oven.
At 20 minutes, check the bread, but you’ll probably want to put 5 more minutes on the timer. The rolls should be golden brown, and sound hollow when you knock on the bottom. The internal temperature of the challah should be between 90° and 110°. Any of these are decent metrics for when to take the loaves out.
Take your challah out of the oven! It’s so beautiful! I’m proud of you.
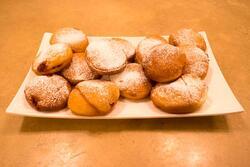
After 10 minutes or so, you can transfer the rolls to a cooling rack, or you can just start eating. What’s great about having these individual challah rolls is that you can eat one right out of the oven and still have a bunch of intact ones to impress guests.
If serving to friends/ loved ones, plate nicely and take an Instagram photo. Tag it @JewishWomensArchive and @lisa.h.y so we can see your beautiful work!
Be safe and be well, and eat challah whenever possible!
Love Lisa's recipes? Let us know what you would like to see next here.


