Sufganiyot (Jelly-Filled Donuts)
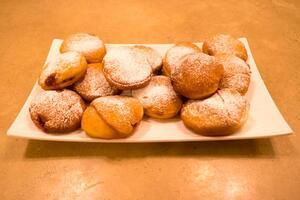
Many American Jews are surprised to discover that donuts—specifically, jelly donuts—are a traditional Hanukkah food. Eating donuts at Hanukkah dates back several centuries in Europe, and is associated with the holiday for the same reason latkes are—foods fried in oil are symbolic of the Hanukkah miracle of a small amount of oil lasting for eight days. Jelly donuts, or sufganiyot, as they’re called in Hebrew, are known today as an Israeli treat (the Labor Federation in then-Palestine declared them the “official” food of Hanukkah in the 1920s), and Americans have happily adopted the custom. Below, JWA food writer Lisa Yelsey shares her own recipe for sufganiyot:
These sufiganiyot got rave reviews from my family, which is shocking only because no one in my family has ever liked jelly donuts before or even voluntarily purchased one. I hope you enjoy them as much as we did and accidentally eat one or three too many, as we also did.
Makes about a dozen 2 to 3-inch sufganiyot.
Estimated total time: 3.5 hours.
Active time: 1 to 1.5 hours
Ingredients:
Dough:
¼ ounce active dry yeast
¾ cup warm milk (I microwaved milk for 30 seconds)
Pinch of sugar + ¼ cup sugar
3 Tbsps butter, softened to room temperature
1 egg
1 egg yolk
2 tsps vanilla
½ tsp cinnamon
Dash of kosher salt
2 ½ cups of flour
More flour as you knead
Filling:
1 cup strawberry jam (or any fruit jam you want), store-bought or homemade)
Extras:
4-5 cups of canola oil for frying
Powdered sugar
Additional flour for rolling dough
Materials:
Stand or hand mixer
Surface for rolling out dough
Dish towel
Rolling pin (or wine bottle)
Piping bag, squeeze bottle, or syringe for injecting filling
Several quart pan for frying
Candy thermometer
Paper towels, plate
Tongs
Slotted spoon
Mini sieve or shake bottle for powdered sugar
Directions:
Whisk together milk, yeast, and your pinch of sugar in a small bowl. I recently read that the sugar doesn’t actually affect the taste, it just demonstrates if the yeast has expired or not by causing it to bubble up. Either way, I like to see bubbles coming up to avoid hours of work on bad yeast.
Put sugar and butter into your mixing bowl and blend for a few minutes on medium speed (I used my stand mixer with a paddle attachment).
Crack an egg in a small bowl and then pour it into your mixing bowl. Separate the second egg and pour just the egg yolk into the mixing bowl. Whisk to combine.
Add vanilla and yeast mixture and mix for another minute.
If using a stand mixer, switch out the paddle attachment for a dough hook.
In a medium bowl, combine flour with salt and cinnamon.
Run your mixer on low as you add the flour mixture into the wet ingredients, stopping when all flour is added. Be sure to periodically stop the mixer to briefly scrape down the sides of the bowl.
Turn the stand mixer to medium speed once your flour is added. If not using a stand mixer, pour out onto a lightly floured surface and start kneading by hand. After a few minutes, if the dough is still too sticky to handle, add in another ¼ cup of flour. You should be able to pick it up without your hands being coated in dough.
Knead dough for another two minutes on medium speed, then call it a day.
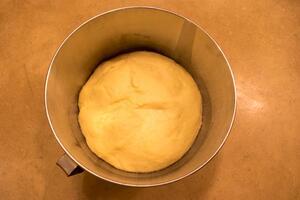
In a clean bowl, pour in roughly 2 tsps of oil. Add the dough, making sure that the oil coats the dough’s whole surface.
Cover with a dish towel and put in a warm, dry place. My kitchen is a little bit chilly so I heated my oven to 100° degrees then turned it off, putting the bowl into the oven when the temperature was about 90° degrees.
Let your dough rise for 90 minutes; it should double in size. I like to take before-and-after photos of the dough just to make sure it’s rising how I want it to.
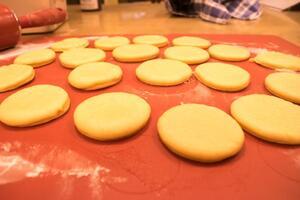
Spread a light coating of flour over your work surface. As you can see in all my pictures I have this red silicon mat, which I love very, very much. It’s nonstick but I typically put some flour over it anyway, and it’s much easier to clean and deal with than a giant cutting board.
Roll out the dough until it is about a half-inch thick all the way across. Using a circular cookie cutter that’s about 2 inches in diameter, cut as many circles as you can from the dough. If you don’t have any cookie cutters, you can also use the rim of a glass.
You can peel away the excess dough and re-roll to create as many donuts as possible. I also like to use some of the excess dough to test out the oil’s frying temperature, since regulating oil temperature can be a nightmare.
Cover the dough circles with the dish towel again and leave for about 30 minutes.
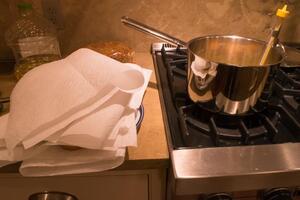
While the dough circles are rising, get your frying station set up! Most of my frying experience is in latkes so I just set this up the exact same way, which seemed appropriate.
Put a few layers of paper towels on a plate next to the oil pan, and keep the paper towels handy right next to it. I would love to figure out a way to do this that feels less wasteful and uses fewer paper towels, but for now this is a once-a-year thing and the paper towels are crucial for draining oil from the fried donuts.
Pour oil into the pan until it is about 2 inches deep. I believe I ended up using about 4 cups of oil, but the amount will depend on the size of your pan. Turn the stove to medium heat, but keep a close eye on the thermometer. During the course of frying my sufganiyot, I ended up lowering and raising the heat from low to medium to deal with temperature fluctuation.
Get your jam ready as well, if you’re using it for filling. Using a good jam is CRITICAL. It elevates a donut, bringing it to a level of eleganceand inherent good taste. When selecting your jam, you want it to be relatively inexpensive, of good quality, and not super chunky. I used Bonne Maman Strawberry Preserves.
I recommend “smoothing” the jam so it’ll pipe easier into the donut. This can be done by pushing the jam through a fine mesh sieve or blending it in a food processor. Honestly, either of these methods are going to be deeply irritating to clean afterwards, but you’re going to have a much better time getting the jam into the donuts.
I put the jam into a piping bag, which worked but really got all over the place. If possible, use a baking syringe or squeeze bottle.
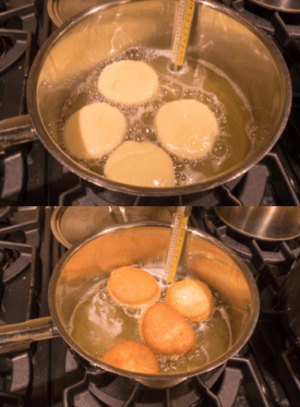
When the half hour is up, check your oil. If you don’t have a candy thermometer, or one that goes up to 350°, test out the oil by putting some of the scrap dough in. The oil should bubble up around the donut, which will float. Raise or lower the temperature accordingly.
When your oil is the right temperature, transfer about four donuts at a time to the pan. I recommend using tongs to keep your hands safely away from the hot oil.
Using tongs, flip the donuts over when the bottom is golden––about 30 to 45 seconds. Fry for another 45 to 50 seconds until the other side is golden. Take donuts out with a slotted spoon (or tongs) so some of the oil can drip off. Place onto the paper towels next to the pan.
Put another few layers of paper towels over the donuts and press down gently to absorb the (honestly alarming) amounts of oil.
Repeat for all remaining donuts, layering paper towels as you go.
Once the donuts are cool enough to handle, it is time to fill them!
If you have a syringe or a squeeze bottle, I’m extremely jealous of you, and you can just inject each donut with the smoothed jam.
If not, use a small knife to make an incision in the side of the donut, making sure you go deep enough to hit the center of the donut. Put the tip of the pastry bag into the incision and squeeze gently to fill the donut. You’ll get a feel for this as you do it and for how much jam is supposed to be in each.
After filling, place each donut so that the injection site is facing upwards and jam will not leak out. You can also slice off some of the excess jam coming out of the side with the knife or wipe it off with a paper towel.
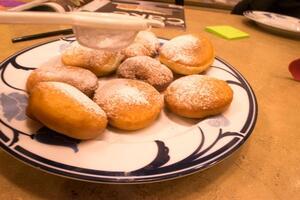
Once you’ve filled all the donuts, put powdered sugar in a small shaker or tiny sieve and shake over the donuts until they are covered in powdered sugar.
You’re good to go! Enjoy these with your family and friends. Happy Hanukkah!


